Insert an image into InDesign
The fastest way to insert an image – or many images – into InDesign is:
- Create the boxes in which to place the images
- Select the images in the Finder or Explorer
- Drag and drop the images inside InDesign
- Click on the InDesign document
- InDesign shows you a preview of the image it’s going to place – click on a box to place the image
You might want to create an object style so that your image is adapted automatically when placed. Go here to see how to do it.
From the menu
- Create the boxes in which you are going to place the images
- Click on File, Place (Cmd + D on MacOS – Ctrl + D on Windows)
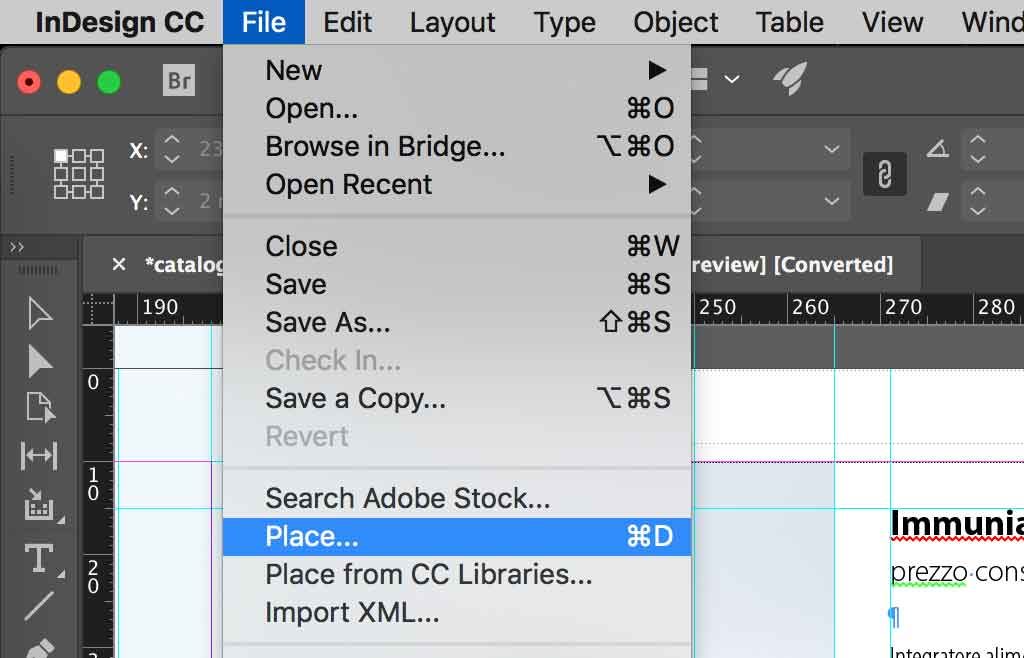
- Select the images in the window that opens and click Open
- InDesign shows you a preview of the image it is going to place, click on a box to place the image
If you select a single box before clicking on File, Place you can place a single image directly in the box
Insert images in InDesign with text inside
There are two ways of dealing with images that contain text and have to be placed in an InDesign document:
- placing the text in the image (not suggested when you’ll produce the document in other languages)
- placing labels on the image in InDesign
Placing the text in the image
I generally discourage people from placing text inside the image file because:
- You can’t control the text properly (style/spelling)
- It makes it harder to translate the document
By creating an image with text inside, you make that image unique to the language version of the document. This means that with at any future translation, you’ll also need to translate the image.
This can potentially be a major issue since you (or another graphic designer) might have to recreate the image in each language from scratch.
InDesign spell-check of course doesn’t work inside images. You can’t use the paragraph and characters styles from your InDesign file to give the style to your text.
By creating an image that contains the textual part, you lose a little bit of control over the text itself.
Working with many duplicates of the same image, even though in different languages, is an organization issue.
It might lead you to make mistakes like deleting an important image, linking the wrong file, or wasting time searching for the right version of the image.
If you need to create a new version of the image, you’ll have to duplicate that version for each language and edit each image manually.
Placing labels in InDesign
It’s true that you can apply some effects only from outside InDesign. And in that case, you have no choice but to place the textual part in the image from Photoshop (or the software of your preference).
However, all the other times, I personally prefer to create the text labels in InDesign, place them over the image, and then group the image with the labels.
Sometimes placing the labels in InDesign might require a little more time than just importing the image with its text. But the effort is usually very limited, and it helps you being better organized.
I prefer the way the text looks in InDesign. I feel more confident with the result, and this practice allows me to be faster with many tasks (edits, updates, translations) because – as I said above – I have control over the text.
It results in a higher quality in the produced document.
Editing the images and its text content becomes faster, which reduces the likelihood of errors occurring.
Group the image with its labels
To make sure the labels always stay with their image in the right place, you should group them together.
Select the labels and the image and click on Object and then Group (Cmd + G on MacOS or Ctrl + G on Windows).
Attach the image to the text
Within InDesign, you can keep an object always in the right position by creating an anchored object.
This forces the object to travel with the line of text it’s associated with, and it works with images, text-frames, and groups.
In case of an image, create the group as we’ve seen above, and then anchor the object. See here how to do it.
Figure legends
If your documents contain complex images with elaborate legends labeling all the important details – you should check this post I wrote for InDesign Magazine: InStep: Making Figure Legends. Unfortunately it’s premium content, so you’ll need to subscribe to InDesignSecrets’ membership to read the instructions.
Working on multilingual projects
Let’s summarize the best practice here.
The best way to deal with your images in InDesign is by:
- creating the image without the text
- importing the image in the document
- creating text-frames with the text (labels) and placing them on the image
- grouping the image and its labels together
- anchoring your image to the associated line of text
When creating and placing the labels on the image, you should take into consideration that the translated text might exceed the original text.
For this reason, you should size the text box of each label so that it can host a longer text without flooding above the detail you want to indicate.
On this topic, I've also written these two articles about how to remove inefficiency and mistakes to avoid when producing documents in many languages.
The fastest way to create your multilingual projects
By structuring your InDesign layout correctly, you’ll be able to create the different language versions of your document much more quickly.
However, if you really want to speed up the creation of your documents, you want avoid mistakes, and you want to cut on the expenses, you should definitely try Redokun.
Redokun is a simple tool that makes it easy to produce your multilingual documents in InDesign, and allows you to be way quicker at implementing last minute corrections and future updates. Try it for 14 days for free.